You must have a basis for thinking constructively.
Hierarchies of Thought
Arrange your thoughts in a hierarchical structure.
You start at level one, sorting out the immediate tactics of the position. If that reveals no clearly best move, you move up to level two, where creative thought suggest moves that may help with strategic objectives. Employ the scanning technique to cover every piece and pawn on the board (you could do the same for your opponent). Any interesting moves are sent to level three for a tactical health check (blunder-check).
Along with the blunder-check the moves that go to level three are looked at in more detail. For it is here we access the strategic gains that may be made with tactical means. And when those are established , discoveries may lead to a modification of our entire strategy.
What did the Opponent's Last Move Change about the Position?
Checks, Captures, Threats (CCT)
(After your opponent's last move check for tactics, threats and captures as your tactical sight is at its height in the first minute you look at the new position.)
Examine the most forcing order of moves; look at all of the possible Checks, Captures and Threats - both yours and your opponent's - to avoid eliminating possible good candidate moves and to identify potential tactical threats.
Calculate until there are no more forcing moves.
Are there new possibilities in the position for tactical or positional exploitation?
Look for overlapping ideas that can be applied from different variations (tactical themes and key in-between moves such as checks and threats).
What was the previous function of the piece your opponent just moved?
When playing a piece in reply, some squares on the board become defended or attacked, but other squares become unprotected. These changes are a source of many blunders or oversights during practical chess; by seeing such consequences you can avoid many errors of your own and benefit from those of your opponent.
Your strongest move often takes advantage of your opponent's last move.
4) Pawn Structure : What can we read from the current pawn formation?
a) Where are the open lines and diagonals?
b) Are there any weak or strong squares?
c) Which pawns are weak?
d) Where are the appropriate pawn levers and how would they impact the position on the board.
e) Who is controlling the center?
f) Who has more space and where on the board does he have it?
5) Which pieces are active and which are not? (the queens, rooks, bishops and knights)
6) Potential endgame advantages.,
2) Scanning
Scanning Technique
The "scanning technique" teaches us the importance of the "searching" quality that is required to be a good player. We are constantly searching for the best move, even after we spot moves that appear "logical" or "forced".
Once we have established that our move is not forced, we first need to survey the options available to us. For this, I strongly suggest employing the "scanning technique" to make a list of possible good-looking moves, what we call "candidate moves".
To employ the scanning technique, first scan the board from the a-file to the h-file, starting with the pieces and then the pawns.Try to find all possible good-looking moves for each piece and make a mental list. Then do the same for all the pawns. Now we have a complete list of all the candidate moves in the position. We can then proceed to follow any of the approaches below:
- Remove bad-looking moves from the list by process of elimination;
- Analyze the most forcing continuations (checks, captures, threats and pawn breaks) to see if they work; or
- Analyze the move you like most and if it looks like it won't work, follow the process of elimination to discard bad ideas or search for the most forcing continuation.
Surprise your opponent with the Pirc or Modern Defense
In the beginning of the 20th century, hyper-modernism made its appearance in chess. Since then, many chess players have finally discovered its ‘dark side’ (the dynamic style); the chess game proved to be richer than it had been thought to be before, and it began to change, from classical chess to a more active and unpredictable game.
As a consequence of this development, new openings were tested. In some of them, the influence on the centre was exerted from a distance.
This blog is about two such systems: the Pirc and the Modern Defence.
Pirc 1.e4 d6 2.d4 Àf6
Modern 1.e4 g6
Both systems have long since established them selves as a universal opening weapon for the creative player
The failure of many attempts to refute Black’s defence outright with a quick occupation of the centre and a straight assault (such as the Austrian Attack with f2-f4) prove that it is still very much alive and kicking.
The main opening resources and pawn structures...
White:
* maintain his centre and develop
* attack in the centre (e4-e5)
* attack on the kingside (h2-h4)
* a typical at tacking set-up with pieces is f3 / B-e3 / Q-d2/B-h6 etc...
Black:
* usually pre pares ...e7-e5
* the universal set-up with ...c6-b5
* the modern set-up with ...a6-b5
* some times the Sicilian Dragon structure appears after ...c7-c5
* Benoni structure: ...c7-c5 and White replies d4-d5
* King’s Indian: ...e7-e5, and White’s d4-d5
* Ruy Lopez: ...e7-e5
* Philidor: ...e7-e5 and ...exd4
This list of options shows the great flexibility of the combative Pirc-Modern Defence. Many times we can see motifs from the Sicilian, the Benoni and certain other openings, and also transpositions, in a single game.
The Pirc-Modern Player
From the beginning, White can choose to go for forced and aggressive lines, or he can also choose among many positional plans, trying a different playing style every time. However, most of the time the character of the positions and the play in the Pirc-Modern set-up is ultra-dynamic.
Nowadays, the Pirc-Modern remains in the repertoire of many players as a nice dynamic option in must-win situations with black. On the other hand, it is also played by super grandmasters such as Ivanchuk, Grischuk, Kramnik and Nakamura who know perfectly well how to use the ‘active-side’ of their chess talent. This perspective allows them as it were to take the chess game into a new dimension.
The Pirc-Modern player doesn’t need to have a phenomenal memory combined with some wishful thinking. He should first of all get the feel of this fascinating opening, and then use his fighting spirit!
The idea behind this move is similar to 4...a6 in the Sicilian Najdorf. Black intends to expand on the queenside with b5 and attack the e4-pawn with B-b7, N-f6 and maybe b5-b4.There is only one problem with that set-up here: White can meet N-f6 with e4-e5. Therefore Black must weaken White's control of the e5-square before playing N-f6. This is done by playing B-b7, N-d7 and then c5, intending to exchange the c-pawn for White's d-pawn. In this way Black undermines White's d-pawn, gains control of e5, and then the knight can go to f6 without fearing e4-e5. Note that this idea would be worthless if White's knight was not on c3 already. White must have played N-c3 or else b5 will strike thin air and c5 will be easily met by c3.
Black can also convienentily adopt a hippo set-up from this move-order.
with c6...
1.e4 g6 2.d4 B-g7 3.N-c3 d6 4.B-e3 c6
The queen is often well-placed on c7, where it supports e7-e5 and stops e4-e5.
The queen can also swing to a5, threatening Nf6 x e4.
If White screws around, Black can play either d5, claiming an equal share of the center, or b5, threatening to undermine the defense of White's pawn on e4.
If Black feels like living dangerously with Nb8-a6, the knight can quickly find a home on c7…
It's a waiting move; Black gets to play a noncommittal, but useful move while he waits to see where White will put his pieces, in particular, his king.
If white goes with Be3 and Qd2 plan (standard long castle thing), c6 supports b5 combined with knight maneuver b8-d7-b6-c4. If white doesn't do anything about that knight, black is going to exchange knight for bishop in e3. Black is also happy if white exchanges the e2 bishop to c4. Black is also happy if white takes away the c4 square by playing b3, as it weakens the dark squares in the diagonal of g7 bishop. Against white's long castle plan b5 is of course quite useful by itself too.
What did the Opponent's Last Move Change about the Position?
⦁Examples include: new threats from the piece moved; new threats from other pieces uncovered by the move; squares weakened; new opportunities for checks, captures and threats on my part.
Checks, Captures, Threats (CCT)
⦁Examined in the most forcing order of move types; look at all of the possible checks and captures - both yours and your opponent's - to avoid eliminating possible good candidate moves and to identify potential tactical threats.
⦁Calculate until quiescence (no more forcing moves).
Update Plan / "To-Do list"
⦁Do my current objectives still make sense in light of my opponent's move and CCT?
⦁Are there new possibilities in the position for tactical or positional exploitation?
⦁In the absence of a clearly superior/winning plan, how do I best improve the placement of my pieces?
Finalize Candidate Moves and Falsify Them
⦁Look seriously at each move, to avoid dismissing a better move too early.
(Scanning Technique)
⦁Look for overlapping ideas that can be applied from different variations (tactical themes and key in-between moves such as checks and threats).
⦁Put effort into "switching sides" mentally and attempting to destroy your position after visualizing the selected move.
The usual caveats to thinking processes apply. The sequence is generally followed rather than rigidly applied on each move and some elements will be emphasized more, depending on the nature of the position (e.g. highly tactical vs. closed). It doesn't include everything I will think about during the game, especially strategic and positional considerations, but does represent what needs to be accomplished on each move in order to have it be sound.
Lasker has famously expressed this process, "When you see a good move, look for a better one". This teaches us that there are good-looking moves and there are good moves. Our analysis alone should establish the difference between the two - not our likings or prejudices.We may like to move our pieces around the board in a certain way, and we should analyze these moves first, but this should not be a factor in deciding the final move that is played.It is essential to be as objective as possible without curbing our natural instincts. Not an easy task, but entirely possible!
It also teaches us the importance of the "searching" quality that is required to be a good player. We are constantly searching for the best move, even after we spot moves that appear "logical" or "forced".
Once we have established that our move is not forced, we first need to survey the options available to us. For this, I strongly suggest employing the "scanning technique" to make a list of possible good-looking moves, what we call "candidate moves".
To employ the scanning technique, first scan the board from the a-file to the h-file, starting with the pieces and then the pawns. Try to find all possible good-looking moves for each piece and make a mental list. Then do the same for all the pawns.Now we have a complete list of all the candidate moves in the position. We can then proceed to follow any of the approaches below:
- Remove bad-looking moves from the list by process of elimination;
- Analyze the most forcing continuations (checks, captures, threats and pawn breaks) to see if they work; or
- Analyze the move you like most and if it looks like it won't work, follow the process of elimination to discard bad ideas or search for the most forcing continuation.
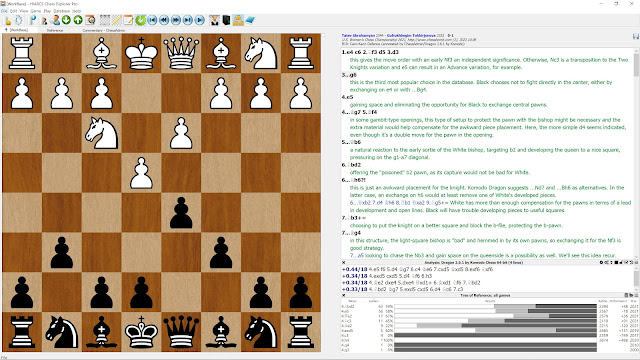
As a follow up to the Chess Computing Resources post, here I'll highlight the recent release (January 2022) of HIARCS Chess Explorer Pro (HCE for short). I was made aware of it in a blog post by NM Hans Schut, then decided to try it for myself, as a replacement for using ChessBase 15 (CB15). One of the key features is the program's ability to read (and convert) CB files to its own format, so it can genuinely replace the use of ChessBase without losing access to previous work.
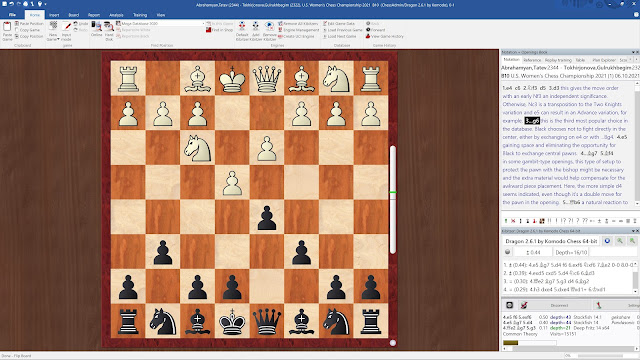
I had been tired for a long time of ChessBase's long-standing annoying bugs and GUI limitations/quirks, but the final push to switch came when I was analyzing the last commentary game (Abrahamyan - Tokhirjonova from the 2021 US Women's Championship). A complicated, 66-move middlegame maneuvering struggle, this required more time than usual to go through, and during one analysis session the ChessBase window crashed and I lost over 2 hours of work. Most modern programs these days have an auto-save feature for just this reason, but unfortunately not ChessBase.
As with any new program, it took a little experimentation to get the HCE Pro GUI setup the way I wanted and figure out how to do things like set the chess engine parameters. For most of my chess analysis/study needs, I want to have visible:
A large board display
Notation window, where variations and notes are entered
Engine analysis window
Reference database window
Here's what that looks like in HCE Pro. My current setup is Deep HCE Pro (allows up to 16 cores for engine analysis), Dragon by Komodo 2.6.1 engine, and for the reference database MegaBase 2020 converted to HCE format, with the packaged HCE MasterBase of recent games imported into it.
Compared with my setup in CB15:
In HCE Pro, the particular game I'm working on is copied into [Workbase], one of the included databases, which is designed for storing your current work and (very importantly) will autosave it. Once you're done with a game, it can simply be copied back into whatever database you want.
In general, I much prefer the HCE Pro setup, which gets everything I want on a single, clean-looking screen. (In the view menu, note that it uses the term "Explorer" to describe its main windows, which can be toggled on/off.)
As can be seen in the top screenshot, there is easily room for the reference tree window ("Tree Explorer") at the bottom right in HCE. In my previous CB15 setup, it's a separate tab in the notation window.
Adding "Book Explorer" will let you view either local or online book trees, which are easily selectable from the buttons on the window. I tend not to use this feature much, instead relying on the reference database and engine evaluation, but for others the book availability can be an important added feature for analysis.
Notes and variations in the notation are displayed more readably in HCE when paired with a large board, although I think CB15 does a better job of visually displaying multiple sub-variations in a unique way.
The engine window ("Analysis Explorer") has all the necessary information at a glance and you can adjust engine settings using the icons. However, version 1.0 has these setting adjustments as temporary only, so to save them for the next session, you'll need to go to Edit - Preferences - Engines and double-click on the engine name to permanently change its parameters.
The tabbed main window in HCE allows for easier switching between open databases. You can also toggle on/off the current database game list at the bottom of the screen ("Game Explorer").
The one quirk for me with HCE is that the board is on the left of the screen and the right side columns can't be further resized beyond what you see above; so if I want the board centered for my vision, I need to use the hack of physically moving my monitor over to the right. This is a relatively minor thing, however.
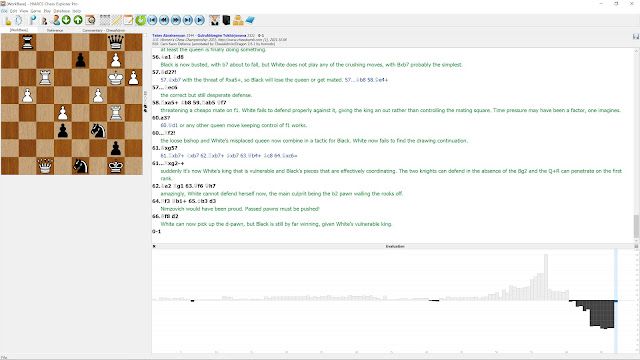
HCE has some other useful tools, which I may comment more on with further use. The "Evaluation Explorer" is a nice way to see the ups and downs of a game in a visual display. The long struggle of the last commentary game, for example, looks like this:
The legendary Bobby Fischer scored a number spectacular victories with the King’s Indian Attack. On this page you can learn the ins and outs of this versatile chess opening.
The King’s Indian Attack Theory
According to the King’s Indian Attack data onchess.com, white wins 38% of the time, draws 37% and loses 25% of all games in their database. This is a pretty good score for white.It’s worth mentioning that due to the highly strategic nature of this opening, computer evaluations of the King’s Indian Attack aren’t always reliable.
Introduction to the King’s-Indian Attack (KIA)
Diagram above: This position was reached after the initial moves 1.Nf3 Nf6 2.g3 d5 3.Bg2 c6 4.d3 Bg4 5.O-O Nbd7 6.Nbd2 It is a typical position you will reach when you play the King’s-Indian Attack (KIA) as white. Bobby Fischer scored spectacular victories with this opening system.
The King’s Indian Attack (KIA) is an Opening System
An opening system is a chess opening that allows you to:
Use various move-orders to reach the same piece-setup.
Achieve the same piece-setup against almost any opening moves your opponent plays.
Characteristics of the King’s-Indian Attack
Diagram above: The King’s Indian Attack is often characterized by an all out attack on black’s king-side. However, before you can attack, there is a few other typical goals too:
Develop your pieces and get your king safe (castle) before you consider an attack.
Get a pawn to e5 from where it gives white a space-advantage on the kingside (if black has a pawn on e5, you usually want to attack it by preparing to play f2-f4).
Once your development is complete, launch an all-out attack on the black king.
Avoid pointless piece-exchanges early on–you need the pieces to attack your opponent.
However, white should be flexible too. Depending how black plays, white may decide to rather focus on the center or expand on the queen-side.
Note: Many of the positions and suggested moves on this page are based on actual games from chess masters who played the King’s Indian Attack Opening.
Reasons to study the King’s-Indian Attack
The King’s-Indian Attack is a solid opening that’s fairly easy to learn.It is a good choice for players who don’t want to spend too much time memorizing countless opening variations.
However, you should also understand that your position can become fairly passive if you don’t put forth a special effort to attack your opponent. This implies that even though you don’t have to memorize variations, you should still study the main attacking ideas of the opening.
Whether you decide to add this opening to your repertoire or not, it is still a good idea to study the basics of it since your opponent may at some point play it against you. Additionally, reviewing the essential aspects of this opening will expand your overall knowledge and understanding of the game.
KIA: The Knights
In this section we will study:
How to initially develop the knights in the King’s Indian Attack.
Typical ways to further improve the role of your knights once their initial development is complete.
Diagram above: Development of the g1-knight.
Nf3 is usually played on the first or second move (after 1.e4).
Nf3 attacks the e5-square, preventing black from playing e7-e5 right away.
Nf3 prepares to castle king-side as quickly as possible.
Diagram above: Development of the b1-knight.
Nbd2 supports the e4-pawn.
Nbd2 supports the f3-knight.
Ndb2 temporarily blocks the view of the c1-bishop but white intends to move this knight to a better square soon.
Nc3 would also be a good development move but is not the main move in the KIA.
Nbd2 does not block the c-pawn like how Nc3 would. This allows white to advance the c-pawn in some variations.
Diagram above: Ideas to improve the role of the knights.
With the black bishop on f5, white can play Nh4, threatening Nxf5, obtaining the bishop-pair advantage.
Nh4 Bg4 2. h3 Bh5 3.g4 Bg6 is a typical sequence to gain time and space on the kingside when black has a bishop on f5.
Nh4 clears the way for the f-pawn to advance at the right time.
Diagram above: Ideas to improve the role of the knights.
Ne1 prepares to attack the centre by playing f2-f4
In cases where there isn’t a black pawn on g6 (which covers the f5-square), white might prefer to play Nh4 instead of Ne1, since the knight would also support the f5-square.
Diagram above: Ideas to improve the role of the knights.
Nf1 is a common move in the KIA that opens the diagonal for the c1-bishop.
Nf1 is mostly played when Nb3 or Nc4 doesn’t suit the position.
Nf1 prepares to play Bf4 (defending the important e5-pawn), followed by h2-h4, attacking the black kingside.
From f1 the knight will usually join the action again via the e3-square or via h2-g4, after advancing the h-pawn.
Diagram above: Ideas to improve the role of the knights.
Ne4 is usually possible when your e-pawn gets exchanged for black’s d-pawn.
Ne4 opens the view of the c1-bishop.
Ne4, in this case, attacks the c5-pawn.
Ne4 forces the black queen to keep an eye on the d6-square.
Diagram above: This is a typical position you will aim for in the KIA opening. Note how white brings his forces towards the black king side, whilst the e5-pawn restricts the overall mobility of black’s pieces.
Ng4 is an active move that increases the activity of the knight and brings more force to the black king-side.
The knight arrived on g4 via the route Nb1-d2-f1-h2-g4.
Ng4 coordinates with the f4-bishop to add pressure on h6.
Ng4 further supports the e5-pawn.
KIA: The Bishops
In this section we will study:
How to initially develop the bishops in the King’s Indian Attack.
Typical ways to further improve the role of your bishops once their initial development is complete.
Diagram above: Initial development of the f1-bishop.
Bg2 wants to become useful on the h1-a8 diagonal.
Bg2 gives important protection to the light squares on white’s king-side. This is important since g2-g3 weakened the h3, f3 and g4 squares.
Bg2 helps white prepare to castle king side.
Note:In most cases white should avoid exchanging the g2-bishop. If you do exchange it, you would exchange it for black’s light-square bishop, else black can use their light-square bishop to cause a lot of trouble on your weakened light squares.
Diagram above: Initial development of the c1-bishop.
White’s pawn move d2-d3 also serves to “develop” the c1-bishop.
In the KIA, the c1-bishop is already active from its starting square.
Further development of the c1-bishop is usually delayed until it becomes clear how to improve its role.
Diagram above: Ideas to improve the role of the bishops.
Bf4 is the usually the ideal way to develop the c1-bishop if you managed to get a pawn to e5.
Bf4 protects the important e5-pawn.
Bf4 gives the d2-square to the queen as a possible development square since the queen now won’t block the c1-bishop.
Bf4 over-protects the e5-pawn, which means the f3-knight is now free to move to another square if/when needed.
Diagram above: Ideas to improve the role of the bishops.
b3 prepares to develop the c1-bishop to b2.
b3 makes sense in this position since black has played an early h6, which means the c1-bishop will not be effective on the c1-h6 diagonal, ie. Bf4 could run into g7-g5.
Due to black’s setup, white won’t get a pawn to e5, which means on b2 his bishop will be useful on the a1-h8 diagonal.
Diagram above: Bd2 prepares to play Qc1, followed by Bh6, exchanging the dark-squared bishops.
For the same reasons that white wouldn’t want to exchange his g2-bishop, black doesn’t want to exchange their g7-bishop. The idea to play Bd2, Qc1, Bh6 can of course only work if black fianchettoed his bishop on the king side.
KIA: The Rooks
In this section we will study:
How to initially develop the rooks in the King’s Indian Attack.
Typical ways to further improve the role of your rooks once their initial development is complete.
Diagram above: Initial development of the h1-rook.
0-0 develops the h1-rook and brings it closer to the centre. In future it will probably be useful on either the f-file or e-file.
0-0 also ensures that your king is taken out of the centre, which makes him a lot safer.
On f1 the rook supports a possible pawn advance f2-f4 (under the right circumstances).
The f1-rook could also move to e1 if the centre opens up.
Diagram above: Initial development of the a1-rook.
The initial development of the a1-rook is usually delayed until it becomes clear where its role would be most useful.
It is even possible that the rook will remain on a1 from where it can support an expansion on the queenside with a2-a4-a5.
In cases where the c-file opens up, the a1-rook could possibly move to the c-file.
Diagram above: Ideas to improve the role of the rooks.
Re1 is a useful development for the rook, particularly if it is clear that the centre won’t be closed.
If the centre were to be closed, in other words if black had a pawn on e5 and also played d5-d4, then the white rook should stay on f1–from where it can support the later pawn-advance f2-f4.
KIA: The Queen
In this section we will study:
How to initially develop the queen in the King’s Indian Attack.
Typical ways to further improve the role of your queen once her initial development is complete.
Diagram above: The opening stage is near complete, but the queen is still on her original position. The queen is vulnerable to threats from enemy minor pieces. That is why you will usually delay development of the queen until it becomes clear where she can occupy a safe square and perform a useful role at the same time. This is true for most openings.
Diagram above: Ideas to improve the role of the queen.
Qe2 is a common way for white to defend the important e5-pawn.
Qe2 clears the d1-square which can possibly be occupied by the a1-rook later.
Qe2 further clears the way between the white rooks so that they are one step closer to being connected. (Connecting the rooks is a common objective in the opening and moving the queen is an important step towards achieving it.)
Diagram above: Ideas to improve the role of the queen.
Qb3 is a typical queen-development move in positions where white played c2-c3.
Qb3 attacks the b7-pawn and makes it harder for black to develop the c8-bishop.
Diagram above: Ideas to improve the role of the queen.
Qe1 occupies the e-file and prepares to play e2-e4 and possibly e4-e5.
By playing Qe1 white also declares that the f1-rook may in fact be useful on the f-file, should white play the pawn-advance, f2-f4, later on.
Qe1 moves the queen off the d1-h5 diagonal and avoids the possible problems that may arise from the g4-bishop pinning the f3-knight to the queen.
The queen can potentially develop on the e1-a5 diagonal later on.
Qe1 clears the d1-square for the possible Ra1-d1 later.
KIA: The Pawn structure
Lastly, but definitely not least, we will study:
Initial pawn-moves that help you achieve the development and centre-control objectives.
Strategic “pawn-play” ideas that may arise in the King’s Indian Attack.
Diagram above: Initial pawn-moves.
g3 opens the g2-square for the development of the f1-bishop
g3 covers the f4-square and supports a possible f2-f4 later on
g3 weakens the light squares on white’s king-side. This is why it is important for white to avoid exchanging the light-squared bishop since that might give black an opportunity to exploit the weakened squares h3, g2, f3 and g4.
Diagram above: Initial pawn-moves.
d3 is an essential pawn-move in the King’s Indian Attack.
d3 covers the e4-square and prevents black from playing e5-e4 right away, hitting your f3-knight.
d3 supports the e4 and c4 squares.
d3 opens the c1-h6 diagonal and clears the way for the c1-bishop.
Diagram above: Initial pawn-moves.
e4 is a typical King’s-Indian pawn move that strikes back in the centre.
In this particular position white is inviting black to close the centre with d5-d4, after which white will aim to attack black on the king side by preparing f2-f4.
e4 also blocks the e5-pawn and block black’s idea to play e5-e4.
Diagram above: Black just played e5 and threatened to follow with e5-e4. This another example of a situation where white need to play e2-e4 in order to prevent black from playing e5-e4.
Diagram above: e4-e5 is a typical pawn advance in the KIA.
e5, hitting the f6-knight and winning a tempo is a typical pawn move in the KIA.
By hitting the f6-knight, white removes the defender of the h5-square and prepares to play h4-h5, attack the black king side.
e5 divides the board in half. The black pieces will now find it difficult to play on the king side as white prepares to launch his h-pawn towards the black king.
After e5, play might continue… Nd7, Qe2, b5, h4.
Diagram above: In this position e4-e5 isn’t good. In principle, you should only advance pawns into enemy territory if your pieces are ready to support them. In this position (with the black bishop on g7 and a black pawn on c5 that prevents d3-d4), e4-e5 is a mistake since black can play Ng4 and put a lot of pressure on the e5-pawn.
Diagram above: Pawn-play ideas.
c4 attacks the d5 pawn with the idea to improve the position of the d2-knight, 1.c4 d4 2.Ne4 Or 1.c4 dxc4 2.Nxc4 Or 1.c4 0-0 2.cxd5 Bxd5 3.Ne4.
c4 could potentially clear the c-file and white might play Rc1 at some point–once the c1-bishop moves.
Diagram above: Pawn-play ideas.
In this position black clearly aims to control the e4-square, which makes it difficult for white to play e2-e4.
Instead of e4, white now plays c4 and strikes against the centre from the queen side and also prepares to expand on the queen side.
If you want to prevent black from controlling the e4-square in this way, you should change your move-order and play 1.e4 (instead of 1.Nf3 which allows 1… d5), taking an early control over e4. This will depend on your own preferences and on how many variations you want to study.
Diagram above: Pawn-play ideas.
In the rarer cases where black castles queen side, white should launch an all-out attack on the queen side.
In the KIA you, almost always, want to focus your attack on the black king, whether that is on the king side or on the queen side.
Black may want to counter-attack on your king-side, which is why you should launch your own attack as quickly and with as much force as possible.
Diagram above: Pawn-play ideas.
h4 prepares to play h4-h5-h6 and marks the start of a typical KIA assault on the black king side.
In most cases, you should play h4 only once your e5-pawn is firmly supported by your other pieces, else black’s counter-attack in the centre may be very effective.
h4 opens the h2-square which could soon provide a useful development for the f1-knight.
Diagram above: Black just played dxe4. How should you respond, dxe4 or Nxe4?
In the KIA you generally want to avoid early piece-exchanges since that gives black an easy way to achieve an equal position.
Nxe4 is not a mistake, but dxe4 is more in the spirit of the KIA–since it avoids the early piece-exchange Nxe4, Nxe4.
After dxe4, white will follow-up with e4-e5, followed by Ne4. Or, if black plays e5 now, white could play Nc4 and put pressure on black’s e5-pawn.
Note: In principle, when pawns are exchanged in the centre, the centre will open up and the nature of the game will change in that you now will focus your piece-activity on the centre, instead of the flanks.
Diagram above: Black just played Bxf3. How should you respond, exf3 or Bxf3?
Bxf3 is the better move because it keeps your pawn structure intact and avoids “losing” a centre-pawn (since exf3 would take your e-pawn away from the centre).
White achieves a small advantage here since black gives up their bishop-pair without getting any compensation for it.
Diagram above: Pawn-play Ideas.
a4 is a typical KIA-manoeuvre that prepares to bring the d2-knight to c4.
a4 prevents b7-b5.
a4 prepares to further expand white’s territory on the queenside with a4-a5.
a4-a5 makes a rook-lift possible (at a later stage in the game the a1-rook may join the action via a3 or a4).
Diagram above: Pawn-play Ideas.
g4 allows white to expand his space on the kingside and gains a tempo at the same time.
g4 opens the g3-square which can become useful for the d2-knight via f1.
g4 also shows that if black plays Bg4 early on, you can usually gain tempos against the bishop by playing h2-h3 and g3-g4 at a suitable time.
Note: If black plays … Nxc2 then after gxh5 Nxa1, Nf1! The black knight will be trapped on a1. Next white can play Be3, threatening Rxa1. White gets a bishop + knight for his rook.
Diagram above: Pawn-play Ideas.
c3 prepares to support the central pawn-advance d3-d4.
c3 prepares to support a white pawn on e5, i.e. 1. c3 b6 2. e5 Ng4 3. d4.
c3 blunts the role of black’s g7-bishop on the a1-h8 diagonal.
c3 opens the d1-a4 diagonal and makes it possible for the queen to develop to c2, b3 or a4.
Diagram above: Black just played d5-d4, trying to grab space in the centre. How should white respond?
c3 is a typical way for white to dislodge the black d4-pawn.
c3 threatens to exchange a flank pawn for a central pawn, which would increase white’s control over the centre.
c3 opens the d1-a4 diagonal and makes it possible for the queen to develop to c2, b3 or a4.
Diagram above: Black just played d5-d4, with the idea to open up the centre and stop white’s plan to attack on the king side. In principle you shouldn’t attack on a flank if the situation in the centre isn’t very stable. How can white proceed?
White has quite a few options here, but c4 is in the spirit of the opening. (White locks down the centre, which makes the planned king side attack more likely to succeed).
Diagram above: Black used a few moves to fianchetto his queen side bishop, but waited too long to castle and get the king safe.
e5! wins a tempo against the f6-knight.
e5 will be followed-up with e5-e6 on the next move.
e5 takes advantage of the fact that black is still trying to develop and takes the initiative by going on the attack right away. For example 1.e5 Ng4 2. e6 fxe6? Ng5! threatens Qxg4 and Nxe6.
Diagram above: Pawn-play Ideas.
White understands that his pawn on e5 promises a strong king side attack. However, in order to increase the chance of success, he needs to block the centre.
d4 blocks the centre.
d4 gives extra protection to the e5-pawn.
White’s chances of success is based on the fact that black can’t counter-attack in the centre and it’s hard for the black pieces to defend the kingside, whilst the white piece is ready to support a kingside attack, starting with h4-h5 or Ng4 or Bg5 or Ng5.
I hope you enjoyed this unique approach to study the King’s Indian Attack.